WindowsXP下常用IPv6配置
ipv6.exe粗解,希望该文档能够得到不断刷新,共同进步。
在WindowsXP下,好像所有的关于IPv6的配置工作都通过ipv6.exe来完成。打开cmd窗口,执行ipv6,你就可以看到一些帮助信息,截取如下:
usage: ipv6 [-v] if [ifindex]
ipv6 [-p] ifcr v6v4 v4src v4dst [nd] [pmld]
ipv6 [-p] ifcr 6over4 v4src
……
本文主要是介绍ipv6.exe的使用,和在windows端配置IPV6隧道的方法。
1. ipv6 install/uninstall
WindowsXP的IPv6协议栈是需要手动安装的,安装的方法就是执行”ipv6 install”. 别觉得简单,有一次对外测试的时候Juniper的工程师就是不知道这条命令,耗费了很长时间。
当然什么时候如果你不想玩IPv6了,你可以执行”ipv6 uninstall”把IPv6协议栈卸掉。注意有的时候卸除IPv6协议栈是有必要的,因为WindowsXP所带的IE6是支持IPv6的,如果你的机器装上了IPv6协议栈,那么当用IE访问某些同时具有IPv6地址和IPv4地址的站点的时候,IE会首先通过IPv6进行连接,如果失败才会通过IPv4进行连接,这样延时就大了,这时候感觉非常很不好。
2. ipv6 if [ifindex]
在ipv6.exe中,所有的接口都是通过接口索引来标识的,执行”ipv6 if”将能看到所有的支持IPv6的接口及其相关信息(包括接口索引). 如果你需要察看某个具体接口,比如接口4,那么执行”ipv6 if 4″就可以了。
3. ipv6 adu ifindex/address [ life validlifetime ]
通过这条命令你能够给某个接口添加IPv6地址,例如,如果要给接口4添加IPv6地址3ffe:321f::1/64,则需要执行如下命令:
ipv6 adu 4/3ffe:321f::1
有人也许会问,你为什么没有指定子网掩码呢?没办法啊,ipv6 adu这个命令就是不能指定子网掩码啊。所以,你必须指定一条路由,说明接口4是属于什么样的子网的:
ipv6 rtu 3ffe:321f::/64 4
这一点其实也是很正常的,在老版本的Linux中,你除了给一个网卡指定IPv4地址,还需要用”route”命令手动添加一条路由来说明这块网卡是挂在什么样的一个子网上的。
删除一个IPv6地址的方法实在是太()$(#)$*#(了,我找了半天才搞明白怎么弄——就是把一个地址的lifetime设为0!例如,要删除上面指定的IPv6地址,可以执行如下命令:
ipv6 adu 4/3ffe:321f::1 life 0
4. ipv6 rt
这条命令是用来察看IPv6的路由表的,没什么好多说的。
5. ipv6 rtu prefix ifindex[/address] [ life validlifetime ]
这条命令是用来处理IPv6路由表的。注意,这里的prefix是采用的”address/prefixlen”的形式。例如,如果要添加缺省路由,网关为3ffe:321f::1111,则需要执行如下命令:
ipv6 rtu ::/0 4/3ffe:321f::1111
路由表项的删除与接口地址的删除方法一样,把lifetime设为0就可以了。例如,要删除上面指定的缺省路由,可以执行如下命令:
ipv6 rtu ::/0 4/3ffe:321f::1111 life 0
请注意我对命令行的写法,”[/address]”表示这个地址是可以省略的。在如下情况下,接口索引后面的地址可以省略:
(a) 这条路由表示的是这个接口所在的局域网(如前面ipv6 adu部分所示)
(b) 该接口是一个点到点链路的接口(如IPv6/IPv4隧道, 后面会介绍)
6. ipv6 ifcr v6v4 v4src v4dst
这条命令是用来建立IPv6/IPv4隧道(tunnel)的。例如,你要与另一台机器建立IPv6/IPv4隧道,你的IPv4地址是166.111.8.28,对方的IPv4地址是202.38.99.9,那么你可以执行如下命令:
ipv6 ifcr v6v4 166.111.8.28 202.38.99.9
执行完这条命令之后,系统会告诉你新创建的接口的索引值。对这个接口的配置方法与别的接口完全一样,只需要注意一点,它是一个点到点链路的接口。
7. ipv6 ifd ifindex
这条命令是用来删除一个接口的。比如,你建了一条IPv6/IPv4隧道,其接口索引为5,回头你不想要这条隧道了,那么你可以执行如下命令将它删除:
ipv6 ifd 5
7.举例说明
假设:
· 你所获得的IPv6子网地址是3ffe:321f::/64
· 你打算把3ffe:321f::1/128这个地址分配给属于tunnel的那个接口(假设WindowsXP下其接口索引是5;这个接口是可以随便设的(WindowsXP除外, 见注1),
· 你的IPv4地址是166.111.8.28
· 你所属的TunnelServer的IPv4地址是202.38.99.9
WindowsXP下的配置命令(注1, 注2):
· ipv6 ifcr v6v4 166.111.8.28 202.38.99.9
· ipv6 adu 5/3ffe:321f::1
· ipv6 rtu 2000::/3 5
· ipv6 ifc 5 forwards
各种IPv6隧道的配置方法
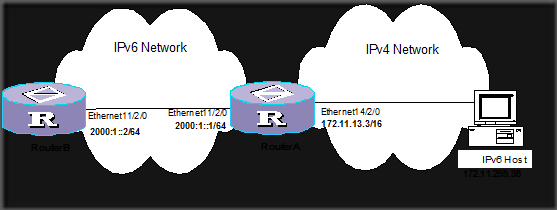
1 隧道配置组网图

2. 手动隧道
WindowsXP配置
打开cmd窗口
安装ipv6协议栈: ipv6 install (如果已经安装IPv6,此步骤略)
创建新的伪接口: ipv6 ifcr v6v4 172.11.255.36 172.11.13.3
WindowsXP自动生成新的伪接口号,本例为7
配置隧道的ipv6源地址: ipv6 adu 7/1000::1
添加ipv6路由: ipv6 rtu ::/ 7/1000::2
查看伪接口5的状态: ipv6 if 7
路由器配置:
[RouterA]:
interface tunnel 1/0/0
ipv6 address 1000::2 64
tunnel-protocol ipv6-ipv4
source Ethernet 14/2/0
destination 172.11.255.36
interface Ethernet 11/2/0
ipv6 address 2000:1::1 64
ipv6 route-static1000:: 64 tunnel 1/0/0
[RouterB]:
interface Ethernet 11/2/0
ipv6 address 2000:1::2 64
ipv6 route-static1000:: 64 ethernet 11/2/0
在PC上执行: ping6 1000::2
ping6 2000:1::2
执行结果: pass
pass
3. 6TO4 tunnel
WINDOWS XP配置:(使用伪接口3)
打开cmd窗口
安装ipv6协议栈: ipv6 install (如果已经安装IPv6,此步骤略)
配置隧道的ipv6源地址: ipv6 adu 3/2002:ac0b:ff24::1
添加ipv6路由: ipv6 rtu 2002::/16 3
添加6TO4中继路由: ipv6 rtu ::/0 3/2002:ac0b:0d03::1
查看伪接口5的状态: ipv6 if 3
路由器配置:
[RouterA]:
interface tunnel 1/0/0
ipv6 address 2002: ac0b:0d03::1 64
tunnel-p
rotocol ipv6-ipv4 6to4
source Ethernet 14/2/0
ipv6 route-static 2002:: 16 Tunnel1/0/0
在PC上执行: ping6 2002: ac0b:0d03::1
执行结果: pass
4. ISATAP tunnle
WINDOWS XP配置:(使用伪接口2)
打开cmd窗口
安装ipv6协议栈: ipv6 install (如果已经安装IPv6,此步骤略)
配置隧道的ipv4目的地址: Ipv6 rlu 2 172.11.13.3
查看伪接口5的状态: Ipv6 if 2
路由器配置:
[RouterA]:
interface tunnel 1/0/0
ipv6 address 14:14:14::/64 eui-64
undo ipv6 nd ra halt
tunnel-protocol ipv6-ipv4 isatap
source Ethernet 14/2/0
注意:在主机端查看伪接口的时候需要注意的是,路由器是否给主机分配了IPv6 的地址前缀14:14:14,如果分配了这个地址前缀,在主机端可以查看如下:preferred global 14:14:14::5efe:172.11.255.36
在发包验证之前需要查看路由器的IPv6地址,本例中为:14:14:14::5EFE:AC0B:D03
在PC上执行: ping6 14:14:14::5EFE:AC0B:D03
执行结果: pass
Windows XP的IPv6陷阱
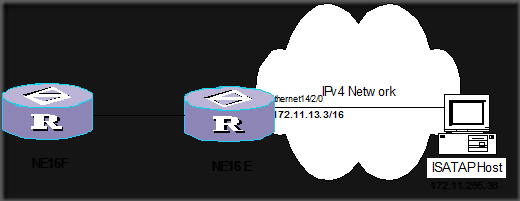
Windows XP在你install ipv6之后会自动添加路由信息,而且显示还是“manual”的,真是好奇怪呀!更奇怪的还在后面呢,当你删除一条静态路由时windows XP会自动添加新的路由信息!更有甚的它还会自动添加伪接口!真是奇怪啊,windowsXP这样做是有问题的,当你建立起隧道的时候,如果不是直连的话肯定是ping不通的,原因就在于这些静态路由会导致在选择路由时错选路由,比如下面的图示中,主机和NE16E建立Isata隧道,如果从主机 ping路由器NE16F,肯定不通,从NE16F去ping 主机,肯定也不通,这时候只有将这些没用的静态路由删除掉才可以ping通,这样的陷阱不知道已经害了多少人了,我就是一个受害者呀,呵呵。不知道微软那些人想到了没有。(安装IPV6 Hotfix WindowsXP-KB817778-x86-CHS-IPV6 PACK.exe或SP2后可以解决这些问题,因为XP SP1中的为试验版的IPV6协议栈)

下面是我做的操作:
Microsoft Windows XP [版本 5.1.2600]
(C) 版权所有 1985-2001 Microsoft Corp.
C:Documents and SettingsAdministrator>cd
C:>ipv6 install
Installing…
Succeeded.
C:>ipv6 rt
::/0 -> 3/2002:c058:6301::c058:6301 pref 1if+2147483647=2147483648 life 2h/30m,
publish, no aging (manual)
::/0 -> 3/2002:836b:213c::836b:213c pref 1if+2147483647=2147483648 life 2h/30m,
publish, no aging (manual)
2002::/16 -> 3 pref 1if+1000=1001 life 2h/30m, publish, no aging (manual)
C:>ipv6 rtu ::/0 3 life 0
C:>ipv6 rt
1234::/64 -> 6 pref 8 life 29d23h59m57s (autoconf)
::/0 -> 6/fe80::204:9aff:fe23:b9e1 pref 256 life 29m57s (autoconf)
C:>ipconfig
Windows IP Configuration
Ethernet adapter 本地连接:
Connection-specific DNS Suffix . : huawei.com
IP Address. . . . . . . . . . . . : 10.110.174.43
Subnet Mask . . . . . . . . . . . : 255.255.255.0
IP Address. . . . . . . . . . . . : fe80::210:5cff:fefd:39e0%5
Default Gateway . . . . . . . . . : 10.110.174.1
Ethernet adapter 本地连接 2:
Connection-specific DNS Suffix . :
IP Address. . . . . . . . . . . . : 172.11.255.36
Subnet Mask . . . . . . . . . . . : 255.255.0.0
IP Address. . . . . . . . . . . . : 2002:ac0b:ff15:5:49ad:586d:7ab7:2797
IP Address. . . . . . . . . . . . : 2002:ac0b:ff15:5:20f:3dff:fe82:b72d
IP Address. . . . . . . . . . . . : 1234::49ad:586d:7ab7:2797
IP Address. . . . . . . . . . . . : 1234::20f:3dff:fe82:b72d
IP Address. . . . . . . . . . . . : fe80::20f:3dff:fe82:b72d%6
Default Gateway . . . . . . . . . : fe80::20d:88ff:fe47:deb9%6
fe80::204:9aff:fe23:b9e1%6
Tunnel adapter Teredo Tunneling Pseudo-Interface:
Connection-specific DNS Suffix . :
IP Address. . . . . . . . . . . . : fe80::5445:5245:444f%4
Default Gateway . . . . . . . . . :
Tunnel adapter Automatic Tunneling Pseudo-Interface:
Connection-specific DNS Suffix . : huawei.com
IP Address. . . . . . . . . . . . : fe80::5efe:10.110.174.43%2
Default Gateway . . . . . . . . . :
Tunnel adapter Automatic Tunneling Pseudo-Interface:
Connection-specific DNS Suffix . :
IP Address. . . . . . . . . . . . : fe80::5efe:172.11.255.36%2
Default Gateway . . . . . . . . . :
C:>ipv6 ifd 6
C:>ipv6 rt
2002::/16 -> 3 pref 1if+1000=1001 life 2h/30m, publish, no aging (manual)
C:>ipv6 ifd 3
delete interface error: 57
C:>ipv6 rtu 2002::/16 3 life 0
C:>ipv6 rt
::/0 -> 3/2002:c058:6301::c058:6301 pref 1if+2147483647=2147483648 life 2h/30m,
publish, no aging (manual)
::/0 -> 3/2002:836b:213c::836b:213c pref 1if+2147483647=2147483648 life 2h/30m,
publish, no aging (manual)
C:>ipv6 rtu ::/0 3 life 0
C:>ipv6 rt
2002::/16 -> 5/fe80::211:5bff:fe5f:3874 pref 4096 life 119m17s (autoconf)
2002:ac0b:ff0f:4::/64 -> 5 pref 8 life 47h59m17s (autoconf)
fec0:0:0:4::/64 -> 5 pref 8 life 47h59m17s (autoconf)
2002:a6e:ae40:4::/64 -> 5 pref 8 life 47h59m17s (autoconf)
::/0 -> 5/fe80::211:5bff:fe5f:3874 pref 4096 life 119m17s (autoconf)
C:>ipv6 ifd 5
C:>ipv6 rt
::/0 -> 3/2002:c058:6301::c058:6301 pref 1if+2147483647=2147483648 life 2h/30m,
publish, no aging (manual)
::/0 -> 3/2002:836b:213c::836b:213c pref 1if+2147483647=2147483648 life 2h/30m,
publish, no aging (manual)
2002::/16 -> 3 pref 1if+1000=1001 life 2h/30m, publish, no aging (manual)
C:>
我是受不了了,估计这样删除下去会把你给累死的!呵呵。
注释
注1
WindowsXP下的接口索引是系统自动生成的, 不能手动指定. 当执行了”ipv6 ifcr v6v4 …”之后,
ipv6 似乎还很遥远…